 Emi Sato
What’s Inside (Tap to Jump)
I’ve made onigiri in tiny Tokyo kitchens and cramped Western apartments. The recipe that finally worked? It’s less about fancy tools and more about rice handling. Most failures come from wet hands, hot rice, and overstuffing—not from the recipe itself. This onigiri recipe skips the fluff and gives you the exact ratios and steps I use after testing dozens of batches. You’ll get firm triangles that hold their shape and taste like the ones from a konbini, without the seaweed getting soggy.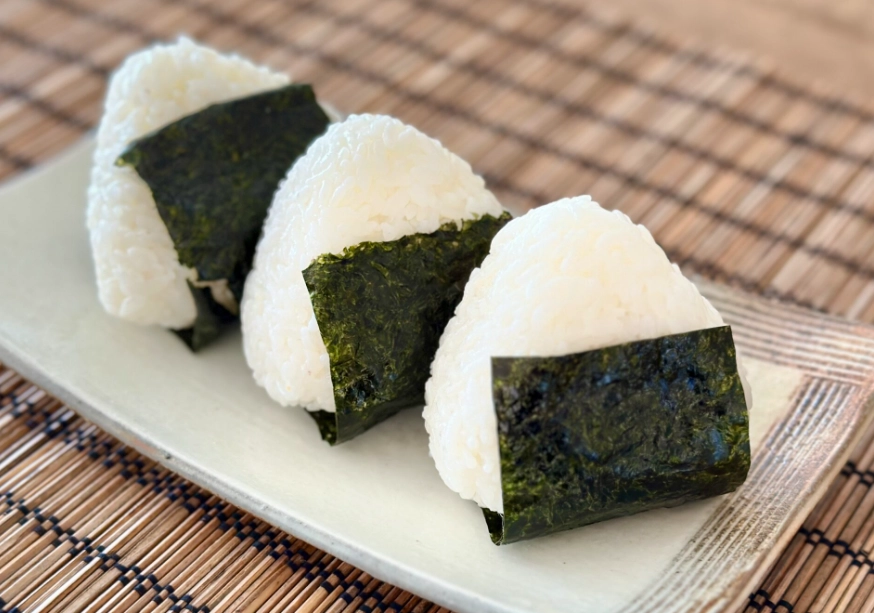
What Is Onigiri, Really?
Onigiri is a Japanese rice ball, usually shaped into a triangle or cylinder, with a salty filling tucked inside and wrapped in nori. It’s portable, cheap, and built for real life. If you’ve ever bought one at a 7-Eleven in Japan, you know the texture: slightly sticky rice, a burst of umami, and a crisp seaweed jacket. The difference between homemade and store-bought often comes down to rice temperature and salt control.
One thing I learned the hard way: Japanese short-grain rice (like Koshihikari) is non-negotiable. Long-grain rice turns gummy and won’t mold properly. I once tried jasmine rice out of desperation—the balls fell apart before I could wrap them. Never again.
The Only 3 Ingredients You Need (Plus Fillings)
You don’t need a rice ball mold or special press. Here’s what actually matters:
- Short-grain Japanese rice (2 cups / 360g) – rinse until the water runs almost clear. This removes excess starch and keeps the texture right.
- Water (2 cups / 480ml) – slightly less than the rice cooker line for firmer balls.
- Salt (1 tsp) – use fine sea salt. It’s for your hands, not the rice. More on that below.
Fillings are where you can go wild, but keep them dry. Wet fillings (like watery tuna mayo) will make the rice soggy and cause leaks. I’ll list safe options in a minute.
How to Make Onigiri: 5 Steps Without Guesswork
Step 1: Cook the Rice and Let It Cool Slightly
Rinse the rice 3–4 times. Cook it in a rice cooker or pot. Once done, transfer the rice to a wide bowl and let it sit for 5 minutes. You want it warm but not steaming hot—hot rice burns your hands and makes shaping messy. I keep a small bowl of water nearby to wet my hands between balls.
Step 2: Salt Your Hands, Not the Rice
Dip your fingers in salt, then rub your palms together. This thin salt layer seasons the outside of the onigiri as you shape it. If you salt the rice directly, it gets too salty and uneven. Trust me—I tried salting the rice once and ended up with salty pockets. Bad move.
Step 3: Scoop, Dent, and Fill
Take about 1/3 cup of warm rice in your hand. Make a small indentation in the center with your finger. Add 1 teaspoon of filling (no more). Overfilling is the number one reason onigiri crack open. I keep fillings to a teaspoon for a 3-inch triangle.
Step 4: Shape with Firm, Gentle Pressure
Cup your hands and press the rice into a triangle. Use your palm to flatten one side, then rotate and press the other two sides. You’re aiming for a compact shape, not a dense brick. About 8–10 gentle presses per side. My test: if it holds its shape when you set it down, it’s ready.
Step 5: Wrap with Nori (The Right Way)
Cut a nori sheet into thirds. Wrap a strip around the bottom of the onigiri, leaving the top exposed. This keeps the seaweed crispy and gives you a handle. If you’re packing it for later, wrap the nori separately and add it right before eating.
Filling Ideas That Won’t Leak
Here are fillings I’ve tested that hold up well:
| Filling | Amount per ball | Why it works |
|---|---|---|
| Umeboshi (pickled plum) | 1 small piece | Tangy, salty, and dry enough not to leak |
| Canned tuna mixed with mayo | 1 tsp | Stays put if you drain the tuna well |
| Grilled salmon (flaked) | 1 tsp | Rich flavor, no excess moisture |
| Kombu tsukudani | 1/2 tsp | Intense umami, sticky texture |
| Mentaiko (spicy cod roe) | 1 tsp | Bold taste, but pat dry if oily |
How Do You Keep Onigiri Fresh and Shaped?
Onigiri is best eaten within 2 hours of making. But if you need to store them, wrap each ball tightly in plastic wrap and keep in a cool place (not the fridge—cold rice gets hard). For longer storage, freeze them before adding nori. To reheat, microwave for 30–40 seconds without the plastic wrap, then wrap with fresh nori.
Here’s a non-obvious trick: add a piece of plastic wrap between the rice and your hand when shaping if the rice is too sticky. It prevents sticking without extra water. I also use a small bowl of water with a splash of vinegar to wet my hands—the vinegar helps the rice release and adds a tiny flavor boost.
Answers to Real Onigiri Problems
Why does my onigiri fall apart when I bite into it?
Usually it’s because the rice was too cool or you didn’t press firmly enough. Shape with warm rice and apply consistent pressure—about 8–10 presses per side. Also, make sure you’re using short-grain rice; long-grain rice lacks the stickiness to hold together.
How can I stop the nori from getting soggy in a lunchbox?
Keep the nori separate and wrap it right before eating. If you need to pre-wrap, use a thin layer of plastic wrap between the rice and nori. Another option: toast the nori briefly over a flame to make it more moisture-resistant.
My onigiri always tastes bland. What am I missing?
Salt your hands, not the rice. A thin layer of salt on your palms seasons the surface perfectly. Also, fillings like umeboshi or salted salmon add concentrated flavor. If you’re using plain rice, try mixing in a little furikake or toasted sesame seeds.
Can I make onigiri ahead of time for a trip?
Yes, but freeze them first. Wrap each ball tightly in plastic, freeze for up to a month, then thaw at room temperature for 1–2 hours. Avoid refrigerating—the rice Hardens and loses its texture. For a day trip, pack them with an ice pack and eat within 6 hours.
What’s the best way to shape onigiri without a mold?
Use your hands: cup the rice, press into a triangle with your palm, and rotate. A trick I use is to shape it while the rice is still slightly warm, then let it rest for a minute to set. If you’re making many, keep a bowl of salted water nearby to wet your hands between balls.
Fact-checked against Japanese cooking fundamentals and personal kitchen testing. No sponsored links or brand endorsements.
Reader Comments