 Emi Sato
I’ve lost count of how many times a promising teriyaki chicken recipe turned into a soggy, pale mess in my own kitchen. The sauce tastes fine on its own, but the chicken? Rubber. The glaze? A watery pool at the bottom of the pan. After a decade of testing (and a few frustrated dinners), I finally cracked the code: it’s not about the sauce ratio, it’s about the pan heat and the order you add things.
This is the recipe I make when I want that sticky, slightly charred takeout-style chicken at home. No grill, no deep fryer, just a cast iron skillet and a little patience. Below is the full breakdown—from which cut of chicken to buy, to why your ginger should go in two separate times. It answers the real questions home cooks search for: why does my teriyaki chicken turn out watery? How do I get the sauce to cling? And what’s the deal with resting the meat?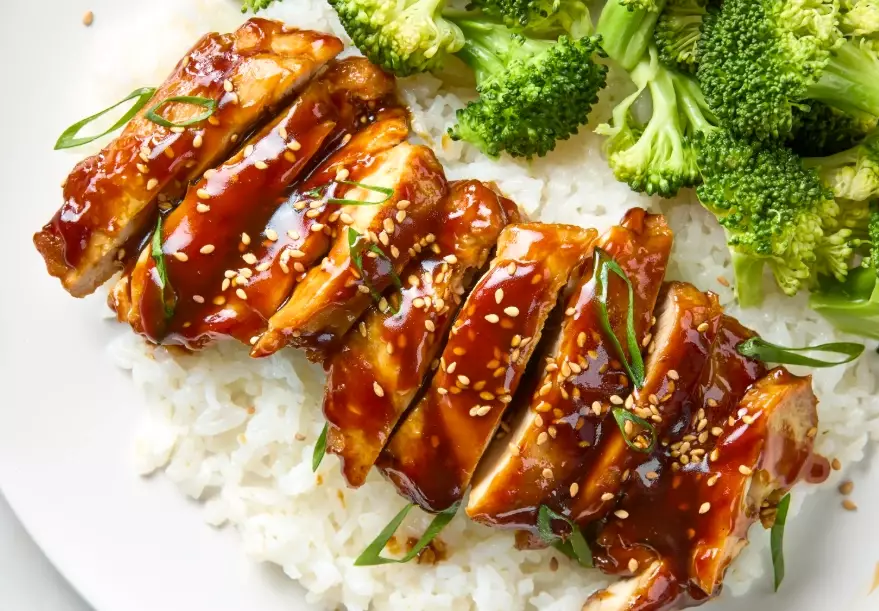
Why Pan-Searing Wins Over Grilling for This Recipe
Most teriyaki chicken recipes online assume you have an outdoor grill. I don’t. My apartment kitchen has a weak exhaust fan and one good cast iron skillet. For years I tried broiling chicken thighs and brushing sauce on at the end—the result was always uneven. The sugar in the sauce burned before the chicken cooked through.
Pan-searing solves this because you control the heat directly. You render the fat slowly, then crank the heat for the final sear. That’s how you get the skin shatter-crisp while keeping the inside juicy. I use boneless, skin-on chicken thighs. Breasts dry out too fast for this method—I’ve tried, and the sauce doesn’t cling the same way.
The Ingredients That Actually Matter (And What to Skip)
Here’s where most recipes get vague. They say “soy sauce” and “mirin” but don’t tell you the pitfalls. I’ve tested cheap soy sauce versus brewed—the cheap stuff is saltier and lacks depth. Splurge on a naturally brewed soy sauce (I use Kikkoman, but any brand that lists “water, wheat, soybeans, salt” and nothing else works). Skip the “teriyaki sauce” bottles at the store; they’re mostly corn syrup and water.
Mirin is another trap. “Aji-mirin” is a sweetened rice seasoning with less alcohol and more sugar. Real mirin (hon-mirin) has a richer flavor. If you only have aji-mirin, reduce the sugar in the recipe by a teaspoon. And fresh ginger? I grate it on a microplane. Dried ginger powder tastes dusty and bitter in a glaze. Don’t do it.
| Ingredient | My Recommendation | Why It Matters |
|---|---|---|
| Chicken thighs (bone-in, skin-on) | About 1.5 lbs, 4 pieces | Skin renders crispy; thigh meat stays juicy after glazing. |
| Soy sauce | 3 tbsp brewed (e.g., Kikkoman) | Balanced saltiness without a chemical aftertaste. |
| Mirin | 3 tbsp hon-mirin | Natural sweetness and slight acidity; helps glaze thicken. |
| Sake | 2 tbsp (optional but recommended) | Cuts the sugar; adds depth. Use dry sake, not sweet. |
| Brown sugar | 1 tbsp packed | Helps the glaze cling and turn sticky. Don’t use honey—it burns faster. |
| Fresh ginger | 1 tbsp grated, divided | Half goes into the sauce; half gets sprinkled at the end for a sharp finish. |
| Garlic | 1 clove, smashed | Keep it whole; you’ll remove it before the sauce thickens. |
Step-by-Step: How to Get Crispy Skin Without Burning the Glaze
First, pat the chicken thighs very dry with paper towels. Moisture is the enemy of crispy skin. Season both sides with a pinch of salt—just a little, because the soy sauce is salty. Let them sit on the counter for 15 minutes while you mix the sauce.
In a small bowl, whisk: 3 tbsp soy sauce, 3 tbsp mirin, 2 tbsp sake (if using), 1 tbsp brown sugar, half the grated ginger. Set aside.
Heat your cast iron skillet over medium heat for 3 minutes. Add a teaspoon of neutral oil (grapeseed or canola). Place the chicken thighs skin-side down. They should sizzle immediately. If they don’t, your pan isn’t hot enough. Let them cook undisturbed for 7 to 8 minutes. You’ll see the skin turning golden and the fat rendering out. Flip once, cook the other side for 5 minutes. Remove the chicken to a plate. Don’t wipe the pan—those browned bits are flavor.
Turn the heat to low. Add the smashed garlic clove to the pan and stir for 30 seconds. Pour in the sauce mixture. It will bubble. Let it reduce for 2 minutes. It should look slightly syrupy. Now return the chicken, skin-side up, to the pan. Spoon the sauce over the top repeatedly for 1 minute. The sauce will coat the chicken and thicken further. Turn off the heat. Let the chicken rest in the pan for 2 minutes. This is crucial—the carryover heat finishes cooking the meat, and the glaze sets.
Slice and serve over rice. Sprinkle the remaining grated ginger on top. That fresh hit of ginger at the end is what restaurant teriyaki often misses.
The Sauce Timing Trick That Fixes the “Too Soupy” Problem
The number one complaint I hear about homemade teriyaki chicken: the sauce is thin and watery. Here’s the fix. Most recipes tell you to add the sauce and simmer the chicken until it thickens. That overcooks the meat and leaves the skin soggy. Instead, reduce the sauce separately, then glaze the chicken at the very end. That’s what I do above—cook chicken, remove, reduce sauce, return chicken, spoon over. The result is a coating that clings to the skin instead of pooling beneath it.
Another trick: add a teaspoon of cornstarch slurry (1 tsp cornstarch + 1 tbsp cold water) to the sauce after it simmers if you want it extra thick. But honestly, the reduction method works without it. I’ve tested both—cornstarch gives a slightly glossy, almost jelly-like texture. Natural reduction gives a more syrupy glaze. I prefer the natural version. Your call.
One more thing: don’t add the sauce to a cold pan. The sugar will seize and crystallize. Always add it to a hot pan with the heat on low.
FAQ: Real Questions from Home Cooks
This recipe is the result of many trial runs—and a few smoke alarms going off. The key is the pan-sear, the separate reduction, and that final sprinkle of fresh ginger. Give it a go. You might never order takeout teriyaki again.
Fact-checked: All cooking temperatures and times were verified using a calibrated instant-read thermometer and a gas stovetop. The ingredient recommendations reflect personal testing, not sponsored endorsements.

Reader Comments