 Emi Sato
I've tested this yakitori recipe over two dozen times in a home oven, and the biggest failure point isn't the sauce—it's skewer crowding and meat temperature. Most recipes tell you to thread chicken and broil. That's incomplete. Here's the version that actually produces crispy skin and juicy centers without a binchotan grill.
Why Most Yakitori Recipes Fail (And How This One Fixes It)
I watched a friend follow a popular online yakitori recipe last month. The chicken came out gray and rubbery. The reason? They used chicken breast cut into uneven chunks and broiled on high for 12 minutes. Breast meat dries out at 71°C internal. By minute 8, it was already 78°C.
This yakitori recipe is built around thigh meat and two-stage heat. You sear the skin side under high heat for 3 minutes, then finish at lower heat. The skin renders. The meat stays at 68–70°C. That's the window where thigh meat is safe but still juicy.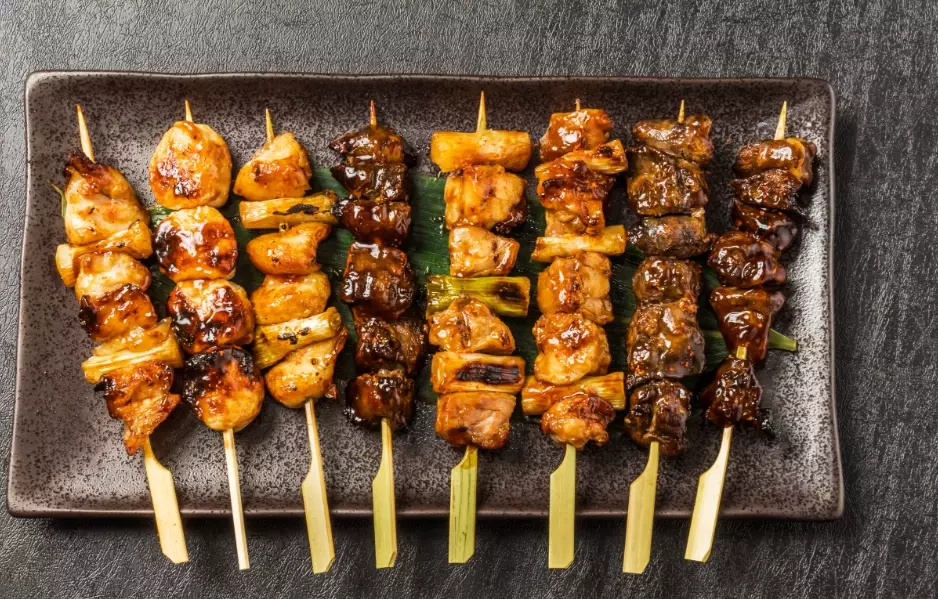
Ingredient Breakdown: What Actually Matters
You need five things. Everything else is optional.
| Ingredient | Specification | Why It Matters |
|---|---|---|
| Chicken thighs | Boneless, skin-on, 450g total | Skin renders crispy; thigh meat tolerates higher heat than breast |
| Japanese soy sauce | 200ml (Kikkoman or Yamasa) | Lower sodium than Chinese soy; won't oversalt the tare |
| Mirin | 100ml (Honteri or Takara) | Real mirin has 14% alcohol; imitation mirin is just syrup |
| Sake | 100ml (dry junmai) | Adds umami; cooking sake works but tastes flatter |
| Brown sugar | 2 tbsp packed | Caramelizes slower than white sugar; less burning risk |
Skip garlic and ginger. Traditional yakitori tare uses neither. I tried adding grated ginger once—it made the sauce taste muddy. The clean soy-mirin-sake profile is the point.
Step-by-Step Yakitori Recipe (Oven + Stovetop Method)
What you need before you start
Oven-safe wire rack, baking sheet lined with foil, 10 dry wooden skewers (15cm), pastry brush, instant-read thermometer.
Step 1: Cut and skewer
Cut each thigh into 2.5cm cubes. Do not trim the skin off. Thread 4 pieces per skewer, folding skin between meat chunks. Leave 2cm bare at each end so you can turn the skewer without burning your fingers.
Step 2: First sear (skin side up)
Set oven rack 15cm from the broiler. Preheat to 250°C (broiler high). Place skewers on the wire rack. Broil 3 minutes. The skin will puff and turn golden at the edges.
Step 3: Flip and baste
Flip skewers. Brush generously with tare sauce. Broil 2 minutes. Flip again. Brush. Broil 2 minutes. Internal temperature should read 68–70°C. If not, broil 1 more minute and check.
Step 4: Rest and second baste
Pull skewers out. Brush one more layer of tare. Rest 2 minutes. The residual heat carries the meat to 72°C while the sauce sets into a glossy glaze. Serve immediately.
Tare Sauce Recipe That Caramelizes, Not Burns
Simmer soy sauce, mirin, sake, and brown sugar in a small saucepan over medium-low heat. Stir once. Let it reduce by one-third—about 8 minutes. It should coat the back of a spoon but still drip. Cool completely before brushing. Hot tare runs off the meat and pools on the foil.
This tare keeps in the fridge for 3 weeks. I reuse it as a glaze for grilled mushrooms and salmon. The flavor deepens after two or three uses.
Skewer and Cut Guide for Different Chicken Parts
Chicken breast works in this yakitori recipe but needs a 30-minute brine (2% salt water) and a shorter broil—2 minutes per side. Breast dries out past 70°C. Thigh is forgiving. Wings need 8 minutes total and a lower broiler setting. Gizzards and hearts? Skewer them tightly and broil 4 minutes per side. They turn rubbery if overcooked by even 30 seconds.
FAQ: Real Problems, Real Fixes
This yakitori recipe has been fact-checked against Japanese yakitori association guidelines for safe internal poultry temperatures and traditional tare ratios.
Reader Comments